2023.10.21
【MW WP Form】ラジオボタン、チェックボックスを画像にする方法(項目はカスタム投稿・カスタームフィールドを使用)
フォームを簡単に制作できるプラグイン「MW WP Form」で、ラジオボタンやチェックボックスを画像にする方法をご紹介いたします。
※残念なことに「MW WP Form」は開発終了となることが2023年9月に開発者より発表されました・・・。
有料でも使うので誰か開発を引き継いで欲しい・・・。
選択項目はカスタム投稿のタイトル・アイキャッチ、カスタムフィールド(プラグイン「Smart Custom Fields(SCF)」を使用)で設定した項目を使います。
カスタム投稿のタイトル・アイキャッチを選択項目として使用する
【STEP.01】MW WP Formにて選択項目を設定 ※ラジオボタンで設定
[mwform_radio name="プロダクト" id="product"]【STEP.02】functions.php設定
カスタム投稿:select_post
function form_select_post( $children, $atts ) {
/* 値を入れるラジオボタンのname属性を指定(サンプルでは「プロダクト」) */
if ( $atts['name'] == 'プロダクト' ) {
/* get_posts()関数で値にするカスタム投稿の配列を取得 */
$products = get_posts( array(
'post_type' => 'select_post',
'posts_per_page' => -1,
) );
/* 取得した配列からタイトルだけを抽出 */
foreach ( $products as $product ) {
$children[$product->ID] = $product->post_title;
}
}
return $children;
}
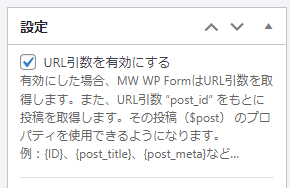
add_filter( 'mwform_choices_mw-wp-form-XXX', 'form_select_post', 10, 2 );//XXXの部分はフォーム識別子パラメーターを有効にする方法(?post_id=XXXX)
//パラメータ設定
function _my_mwform_value( $value, $name ) {
  if ( $name === 'プロダクト' && !empty( $_GET['post_id'] ) && !is_array( $_GET['post_id'] ) ) {
      return $_GET['post_id'];
  }
  return $value;
}
add_filter( 'mwform_value_mw-wp-form-XXX', '_my_mwform_value', 10, 2 );//XXXの部分はフォーム識別子
【STEP.03】フォームのテンプレートを修正
<?php
$select_post_arg = array(
	'post_type' => 'select_post',
	'posts_per_page' => -1,
);
$select_post_query = new WP_Query($select_post_arg);
?>
<?php if ( $select_post_query->have_posts() ) : ?>
<script id="select_post-form">
  var select_postList = {
    <?php while ( $select_post_query->have_posts() ) : $select_post_query->the_post(); ?>
			<?php echo $post->ID; ?>:"<?php if(has_post_thumbnail()){ echo the_post_thumbnail_url('medium'); }else{ echo "/img/noimg.jpg"; } ?>",
    <?php endwhile; ?>
	}
</script>
<?php endif; wp_reset_postdata(); ?>
JavaScriptを追加
var SelectForm = class {
constructor() {
	if (document.getElementById("select_post-form") === null)
	return;
	const checkList = document.querySelectorAll('input[name="プロダクト"]');
	const node = Array.prototype.slice.call(checkList, 0);
	node.forEach(function(elm) {
		let id = elm.value;
		let thumbnail = '<div class="thumbnail"><img src="' + select_postList[id] + '"></div>';
		let parent2 = elm.parentNode;
		parent2.insertAdjacentHTML("afterbegin", thumbnail);
	});
}
};
new SelectForm();
カスタムフィールド(プラグイン「Smart Custom Fields(SCF)」を使用)で設定した項目を選択項目として使用する
【STEP.01】MW WP Formにて選択項目を設定 ※ラジオボタンで設定
[mwform_radio name="プロダクト2" id="product2"]【STEP.02】functions.php設定
カスタム投稿:select_post
function form_select_field( $children, $atts ) {
  /* 値を入れるラジオボタンのname属性を指定(サンプルでは「プロダクト2」) */
    if ( $atts['name'] == 'プロダクト2' ) {
        $args = array(
            'post_type' => 'select_post',
            'page_id' => XXX,//特定の記事のみのカスタムフィールドを使用する場合は設定
            'posts_per_page' => -1,
            'post_status' => 'publish'
        );
        $the_query = new WP_Query( $args );
        if ( $the_query->have_posts() ) :
        while ( $the_query->have_posts() ) : $the_query->the_post();

        $get_group = SCF::get( 'XXX' );//SCFのグループ取得
            foreach ( $get_group as $fields ) {
                $children[$fields['XXX']] =  $fields['XXX'];//SCFのタイトル項目を取得
            }
        endwhile;
        endif;
    }
return $children;
}
add_filter( 'mwform_choices_mw-wp-form-XXX', 'form_select_field', 10, 2 );//フォーム識別子のkeyを入力
【STEP.03】フォームのテンプレートを修正
<script id="select_field-form">
var select_fieldList2 = {
<?php
$args = array(
	'post_type' => 'select_post',
	'page_id' => XXX,//特定の記事のみのカスタムフィールドを使用する場合は設定
	'posts_per_page' => -1,
	'post_status' => 'publish'
);
$the_query = new WP_Query( $args );
if ( $the_query->have_posts() ) :
while ( $the_query->have_posts() ) : $the_query->the_post();

$get_group = SCF::get( 'XXX' );//SCFのグループ取得
foreach ( $get_group as $fields ) {
$imgurl = wp_get_attachment_image_src($fields['XXX'] , 'full'); //SCFのイメージ取得
?>
<?php echo $fields['XXX']; ?>:"<?php echo $imgurl[0]; ?>",//SCFのタイトル、イメージ出力
<?php
}
endwhile;
endif;
?>
}
</script>
<?php wp_reset_postdata(); ?>
JavaScriptを追加
var SelectForm2 = class {
constructor() {
	if (document.getElementById("select_field-form") === null)
	return;
	const checkList = document.querySelectorAll('input[name="プロダクト2"]');
	const node = Array.prototype.slice.call(checkList, 0);
	node.forEach(function(elm) {
		let id = elm.value;
		let thumbnail = '<div class="thumbnail"><img src="' + select_fieldList2[id] + '"></div>';
		let parent2 = elm.parentNode;
		parent2.insertAdjacentHTML("afterbegin", thumbnail);
	});
}
};

new SelectForm2();
以上の設定で、今回はラジオボタンの設定でしたが、MW WP Formでラジオボタン、チェックボックスを画像にすることが可能です。
下記デモページです。